Tampilkan postingan dengan label paper. Tampilkan semua postingan

Kamis, 13 Oktober 2011

How to make origami bats

Wet-fold realistic 3D bats for Halloween! Michael LaFosse has a video demonstration at the Peabody Essex Museum's origami site. To get to the bat video, click "Fold more models," then "Origami Now" and you'll see the "Happy Goodluck Bat." (They will ward off the zombies and vampires that might try to get you.)

Even if you don't make any bats yourself, it's mesmerizing to watch an expert do origami. He makes it look so easy, with none of the consternation, fumbling, and frustrated sighs I like to incorporate into my origami attempts.

Minggu, 14 Agustus 2011

Paper Rose Tutorial

I found this paper Rose tutorial on Tumblr, and it was just too cute not to share. While sassyNpunk is not known for simplicity, I have to admit this tutorial made me smile =)


Senin, 27 Juni 2011

Papercraft camping scene

The brains behind The Curiosity Group have done it again! The July edition of their monthly assemble-it-yourself desk calendar is here. Head to the site to download, print, and build this little retro camping scene.

Jumat, 27 Mei 2011

Doodled frames on envelopes

When in the course of human events it becomes necessary for one people to doodle on envelopes, this is the result. Sometimes mailing a plain envelope just won't do. Hint: laying a business card on top makes a nice template to sketch around if you have trouble with square corners. For some even better frame doodles, see here.

Rabu, 13 April 2011

Origami bunny favor boxes

You know I have a weakness for 3D paper anything, so when I saw an instructional video for origami rabbit cups by Jacky Chan at Origami Spirit, I had to try it. The video moves along briskly so I had to rewind repeatedly, but I prevailed. Hey, now that nobody uses tape anymore, is it still called rewinding? What's it called? But I digress. Go fold some Easter bunnies. If you use 6" origami paper, an egg will fit nicely inside.

Selasa, 05 April 2011

DIY compliment bunting

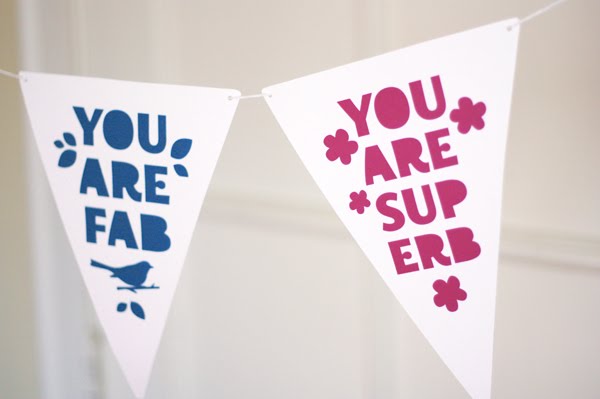
I've created a downloadable file for making compliment bunting. When you need to tell someone they're super, this might be just the thing. Use it for birthdays, promotions or when your friend is sad. Everybody likes compliments. By the way, your hair looks very nice today.

If you happen to have a Silhouette digital cutter and Adobe Illustrator, it's fun to cut out the letters. (You'll need the Cutting Master 2 Craft ROBO plug-in, available here for Mac and PC. Install it, then open the bunting PDF in Illustrator. Delete the extra pages, then go to File > Cutting Master and cut your triangle of choice.)

Or just print your favorite PDF pages on cardstock and cut them out. Punch small holes in the corners and string the bunting.

The PDF contains six pages—three designs in two colors each. Download the complimentary compliment bunting file right here.

Senin, 04 April 2011

April 3D desk calendar

The Curiosity Group comes out with a clever (and free!) printable 3D calendar each month. The April paper toy is a record player with a little cutout in the album that reveals the date. Grab it here.

Or build a calendar of stacking cubes by Pen Pencil Stencil. You'll be set for the year.

Jumat, 18 Maret 2011

Make origami boxes shaped like candies

I tried making these little paper boxes shaped like candies, designed by Makato Yamaguchi. They're a project in a Toyo origami kit for boxes shaped like various sweets. Each candy half is one sheet of folded paper; one end fits inside the other to form a container. You can watch Heather's nice video tutorial right here on YouTube. Collapsing the candy ends is tricky, but I'm improving with practice!

Selasa, 22 Februari 2011

Recycled gift bows: yellow pages version

Here's a less pointy variation of the magazine gift bow. I used the yellow pages this time.

Cut 1" wide strips from pages removed from a phone book. Stacking several sheets and slicing them lengthwise with a paper cutter or rotary cutter is quickest. If you are one of the three people who still use the yellow pages, make sure you don't remove any sections you might need someday, like Clowns or Paternity. (Yes, those are real.)

Cut 5 or 6 full-length strips, depending on how full you'd like the bow to be. Cut 4 strips that are 3" shorter. Save one of the leftover short ends to use in the center of the bow.

Form each strip into an "eight" shape, securing the ends in the center with tape. (The photo above shows five shorter loops, but I ended up using only four.) Make a loop with one of the 3" leftover ends.

Arrange the longer pieces evenly to form a circle and staple it in the center. Swinging open the stapler helps position it without squashing the loops.

Repeat with the shorter set of loops. Then layer the smaller piece on top of the larger piece and staple them together in the center. Attach the single loop to the center with a piece of double-stick tape.

Jumat, 18 Februari 2011

Origami mushrooms

Small paper mushrooms have sprouted on my desk. Each is folded from a quarter sheet (a 75 mm square) of origami paper. I used a hole punch to cut out spots and attached them with a dot of glue. What am I going to do with these? No idea. But they're cute. Get folding instructions here at Origami Club.

Jumat, 04 Februari 2011

Origami box with lid

Check out the teensy origami box I attempted. Success! But I think I muttered, "Wait. What?" about sixteen times while making it. I ignored the recommendation to start with a large sheet of paper and went for the 3 cm box, following this instructional video by Sara Adams. She demonstrates a design by Dave Brill—which must be short for brilliant, because who in the world figures out how to fold a box with a hinged lid from one sheet of paper?

Happy Folding is a fun site with lots of other how-to origami videos. For example, maybe you need a Valentine origami ring to put in that box.

Kamis, 27 Januari 2011

Asterisk heart garland template

Who says Valentine's Day has to be pink? I vote for orange.

To make your own Valentine garland, download my heart template PDF right here. You can print it on a sheet of cardstock* and cut out the inner shapes with a craft knife. I cheated and cut these directly from Adobe Illustrator using my Silhouette cutter, which took mere minutes. Delightful.

*This template only works with orange** paper. If you use another color, your project will fail.

**I am kidding, of course. As soon as I typed that, I realized from past experience that I would get a handful of emails from concerned crafters wondering if this is actually true. It's not.

Selasa, 25 Januari 2011

Make a 3D paper owl

Do you like owls? Do you like paper? Do you have a stack of extra ink cartridges for your printer? Make yourself an owl army in thirteen different colors with printable templates from 3EyedBear.

Rabu, 05 Januari 2011

A yeti paper craft calendar for January 2011

The Curiosity Group has launched a 2011 calendar of the month series, starting with a 3D yeti you can assemble. (Via Paper Forest.) I'm pretty sure I love yetis, especially those holding orange calendars. I'm also pretty sure I don't know what the plural form of "yeti" is.

On a related note, if you feel the need to dress a baby up like a yeti, check out these patterns: a yeti hoodie at Berroco and monster booties by Kelly Hogaboom (a link to the pattern is in her notes.)

Rabu, 15 Desember 2010

DIY striped paper ornament

My Christmas tree needed more orange (of course), so I made this little thing. It appears to be a spaceship which has crashed into a circus tent. To make your own circus spaceship, you'll need two colors of regular paper, scissors, needle, thread, pencil, ruler, and two beads.

1. Cut the paper into strips that are 3.5" long and 0.5" wide. (This makes a small ornament about 3" in diameter.) Cut 9 strips of each color. Cut two 0.75" circles. Tracing around a penny works nicely.

2. Fold the paper strips in half. A crisp fold isn't needed; just a crease will do.

3. String a bead onto a length of thread. Then push both ends of thread through the needle so the thread is doubled.

4. Poke the needle through one of the circles to string it next to the bead. Then string on all the paper strips near one end, alternating colors.

5. After all the paper strips are added, begin threading the opposite ends onto the string. To do this, start with the strip you put on first (the one next to the paper circle). Take its loose end and push the needle through it. Continue threading on the paper strips in order. They'll naturally begin to fan out as you go.

6. Add the second paper circle.

7. Pull the needle off the thread. Feed the bead onto one of the loose ends of thread, then tie both ends of thread in a knot to hold the bead on next to the circle. If your ornament hangs a little crooked, thread the needle again and push both ends of thread up through the underside of the bead and out through the top so both ends of thread emerge. Tie off a loop and hang that spaceship.

My ornament has a bit of a gap on one side where the papers meet at different levels. I'll put that toward the inside of the tree, and no one will be the wiser.

Rabu, 08 Desember 2010

How to make 5-pointed paper snowflakes

Though no longer in elementary school, I still get a kick out of paper snowflakes. I made this snowflake garland the other night from origami paper, dental floss, and tape.

The simplest paper snowflakes are based on 4- or 8-pointed stars (fold a square in half diagonally and keep halving it until it's nearly too thick to cut, then snip out small shapes ). The second and third flakes in this garland are based on a 5-pointed star. Download the 5-point folding directions right here. I think they're easier to cut since there are fewer paper layers.

Here's an 8-pointer. Unfolding is my favorite part; it's practically as thrilling as bungee jumping. To get them nice and flat, iron your snowflakes with the steam setting turned off.

Kamis, 02 Desember 2010

DIY modern paper ornament

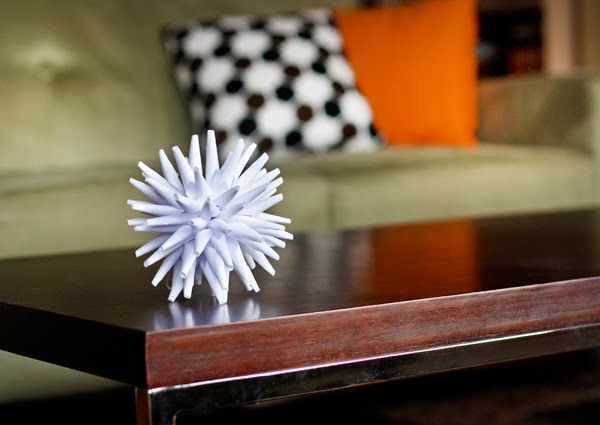
I love spiky starburst shapes, so I attempted a version of the traditional Polish porcupine ball. Here's how to make this cool 3D ornament—great for Christmas or decorating any time. I can imagine jumbo sized versions hanging at parties or weddings. They take awhile, though, so you'd better start making them five years before you plan to get married.

You'll need: Paper, scissors, a circular object for a template, a ruler, pencil, needle, thread, rubber band, and glue.

1. Cut out ten paper circles, using a jar lid or CD for a template. (My circles are 5" in diameter. I stacked sheets of computer paper and cut out several circles at once.)

2. In each circle, cut eight evenly spaced slits toward the middle, stopping about a half inch from the center point.

3. With a pointed pen or sharp pencil, curl each tab into a cone and secure with a dot of glue. If you can pull off a tightly rolled perfect point, congratulations. I was running a little low on patience and settled for "sort of pointy," which I think also looks nice.

4. Cut two small pieces from a wide rubber band. These will hold the ornament together at each end.

5. Thread a needle and knot the ends of the thread together. String on one of the rubber band pieces.

6. Push the needle through the centers of five stars with their flat sides face down. Turn over the remaining five stars so their flat sides are facing up and thread them on, followed by the second rubber band piece.

7. With a chopstick or pencil, push down on the rubber band to compress the stars into a ball while pulling upward on the string with your other hand. The rubber should hold the stack together without requiring a knot. Adjust the paper cones as needed to make a pleasing shape.

8. Tie a loop in the thread for hanging if desired.

Rabu, 03 November 2010

Butterfly invitation template

Let's call this stationery week at How About Orange. Friends inexplicably keep marrying and having babies, so here are some shower invitations I made with a pal last week.

The mom-to-be registered for purple butterfly things, so I had to hold off on the orange cheetah-themed shower that could have been awesome. I think this one might be more tasteful. I made the design in Adobe Illustrator, then cut the cards out with the Silhouette machine. The party information is printed on an interior sheet. It's stapled inside the card along the spine to form a mini booklet. Chartreuse envelopes from Papersource plus these stamps finished it off.

You can download the butterfly template as a PDF file, a zipped Studio file for Silhouette users, or a zipped SVG file for Cricut users. And folks without a digital cutter will have to make do with an X-acto knife. Eek, that's a little bit daunting.

Senin, 18 Oktober 2010

A flower makes everything better

Note to self: when wrapping a gift with a weird shape, it doesn't matter how strange the package looks. Slap a flower on it and people will like it. Paper flower tutorial here.

Jumat, 08 Oktober 2010

How to make recycled paper flowers

I learned to make paper flowers a long time ago with directions from a library book. They don't require any adhesive, and there are just four shapes to cut out.

Use them to decorate gifts or make wreaths. I chopped up a fancy Urban Outfitters catalog for these.

You can make template pieces to trace around and then cut out the shapes with a scissors—what I used to do. But this seemed like a good test for the Silhouette cutter, so I recreated the pattern pieces in Illustrator on my Mac and commanded the machine to cut them for me. It took about fifteen seconds to cut the parts for one flower. Whoa. I shall never return to my primitive, scissors-wielding caveman ways.

If you'd like to download the PDF templates, get the large flower here and the small flower here.

[Cutting from Adobe Illustrator with the Silhouette currently requires a free plug-in called Cutting Master 2 that works with Illustrator 10 - CS5, available for Mac or PC.]

To make the flowers, do the following:

1. Score the back of each petal along the lines shown in pencil, above.

2. Pleat the petals along the scored lines, always folding in the same direction.

3. Fold the triangle portion of the stem in half lengthwise. Do this two more times until it reminds you of a toothpick.

4. Using a chopstick or skewer, roll the "flag" portion of the stem toward the "toothpick." This curl will form the center of the flower.

5. Curl the ends of each petal backward to give them shape.

6. With a skewer or sharp pencil, poke a hole in the center of each flower piece.

7.Thread the pieces onto the stem, from smallest to largest. Finished!