Tampilkan postingan dengan label tutorials. Tampilkan semua postingan

Selasa, 08 November 2011

Decorate felt balls with embroidery

Via Bloomize I came across this Japanese magazine with instructions for making embroidered felt balls (see p. 15). So pretty for Christmas ornaments or shade pulls or embellishments on gifts... True, the directions are in Japanese, but I bet you could figure it out using the diagrams for inspiration. If you want to buy plain felted balls, search Etsy. Or to make your own, try this tutorial.

Senin, 31 Oktober 2011

DIY geometric stenciled tote

ModernMom.com asked me for a little tutorial for their "crafternoon" series. I don't have any kids, but I know some moms, so maybe that qualified me? I sent over an easy stenciled tote bag project. Head over there for the instructions. P.S. Happy Halloween!

Jumat, 28 Oktober 2011

A chair, before and after

Say hello to my new chair. This guy has been sitting in the corner, all done except for those armrests, for several weeks. That's because someone got scissors-happy when cutting out the seat cushions and forgot to leave enough fabric for the arms. And someone's husband graciously stopped at IKEA last night and purchased the required quarter yard of SaraLisa. What a guy.

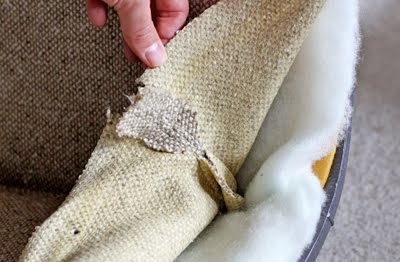
Above is the original chair I bought at Jubilee Furniture. I have a thing for chrome these days. Ooo, shiny! But sad fabric. This chair sort of reminds me of a walker, but I'm okay with that. When I'm 80, I'll have coordinating furniture.

This chair was way easier than the Steelcase business. Essentially two pillowcases for the seat and the back were stapled shut at the bottom.

I added more batting to plump it up a little and cover the disintegrating foam, then used the old covers as a template for cutting the new fabric. I sewed up the new pillowcases, stuffed the chair pieces into them, and stapled them shut again. Of course that covered up the old screw holes in the wood frame, so I had to poke all along the sides of the chair with a needle* to find them again. Then I cut little slits in the fabric with an Xacto knife and screwed the seat and back to the frame.

The arms were the easiest—I detached the old pieces, sprayed some adhesive* to the new fabric, and wrapped it around the old armrests. Snapped them back on, replaced the screws, and we're in business.

*I don't know anything about professional upholstery, so you should probably assume my methods are totally weird. But I like this chair.

Jumat, 21 Oktober 2011

Cheap, trash bag Halloween decorating

In a burst of festivity, I decided we should have some Halloween decorations in the house. Something 1) dramatic, 2) super cheap, and 3) didn't require me to go to the store. Behold: trash bag spiderwebs.

To make these, lay a trash bag out flat. Trim off the sides and bottom so you're left with two big rectangles of plastic. Cut each piece into an approximate square (eyeballing it is fine.)

Fold one of the squares in half diagonally to form a triangle. Fold that triangle in half two more times. This is slippery stuff, so use a few pieces of tape to fasten the layers together on the loose side. It will help hold the shape together when you're cutting. If any of your tape pieces end up on the web itself after you've cut it out, remove them before unfolding.

If winging it makes you nervous, use a black Sharpie to sketch some guides on the plastic: draw a "stem" from the folded point out to the end of your triangle. Then sketch some scallops that come off the stem. With a scissors, cut out the negative shapes and unfold your web. Tape several webs together and add extra strips of plastic to connect them if you like.

Selasa, 04 Oktober 2011

DIY pendant light tutorials

I just bought a white, spherical Fillsta light from IKEA, but if I'd had tons of extra time on my hands, maybe I'd have attempted one of these! Here's a collection of round hanging beauties you can make yourself.

Links to the how-tos:
Faceted paper light from The 3 R's Blog
Wire orb by Orlando Soria
Paper cup light shade at Cut Out and Keep
Lace lamp from the Dos Family
Yarn pendant light at Made By Girl

Senin, 26 September 2011

Metallic oil-based Sharpies = nice

I bought a couple of oil-based Sharpies at Michael's recently—the package says they'll write on metal, pottery, wood, rubber, glass, plastic, and more. I chose a two-pack with gold and silver pens and tried one out on this ceramic cup. Nifty! The paint is opaque and shiny and didn't bead up. Now I'm plotting what else needs gold and silverizing. I'm like Midas with markers.

Jumat, 23 September 2011

Make your own wall art

Folks planning to spruce up the house might enjoy these budget-friendly DIY wall art projects. Some cool ideas for sad and naked walls:
Woodgrain contact paper stripes from Maude at Apartment Therapy
Trendy pinwheel painting by Elise Blaha Cripe
A canvas full of words from Alisa Burke
Log wall display by Liv and Jeff McMillan at Curbly

As for me, I've got another chair makeover planned for the weekend. If it's a success, I'll show you next week. If it flops, just pretend I never mentioned it.

Selasa, 20 September 2011

Reupholstered Steelcase chair project

I paid my first visit to Jubilee Furniture a couple weeks ago and returned with a car full of projects. Jubilee is a giant furniture resale shop in Carol Stream, a Chicago suburb. You'll find mid-century goodies mixed with more contemporary pieces—a whole lot of awesome combined with some things that look like hopeless cases to my non-expert decorator eyeballs. It's a treasure hunt. And somehow Jubilee has assembled a staff made up of the nicest people on the planet, so go visit them! Highlights from new inventory are posted regularly on their blog.

But anyway. While I was there, I came upon two 1982 Steelcase task chairs begging with sad puppy eyes to be rescued. They could replace the not-very-comfy wooden dining chairs Alex and I use at our desks. The challenge was figuring out how to get them apart and re-cover them, because the stained, scratchy burlap-like upholstery had to go. After studying them in the store it was still a conundrum, but Susan the manager cheered us on. (Hi Susan!) So into the car they went.

And we conquered! Say hello to our refurbished woodgrain office chairs. We're in love. In case you, too, ever encounter a Steelcase task chair begging for a re-do, read on to see what we did.

We were champing at the bit to get started on the chairs, but lacked enough free time. So we brought them along on a visit to my family in Minnesota last weekend where they turned into a family project. Everybody had a hand in this chair makeover, which you'll see in the following photos. A disclaimer: We don't know anything about reupholstery, so our method is take it apart and copy what the people before us did.

We easily removed the screws from the underside of the chair to get the pedestal (leg? foot?) off. Then we discovered the front of the seat was attached to the back with small screws hidden underneath a strip of plastic edging (casing? trim?). Let's call it edging. We pried the lip of the edging up with a flat screwdriver to get at the hidden screws to remove them. This involved a lot of wrestling. Good thing Alex was on the team in high school.

See? These screws go in through the back of the chair, pass through the edging on the front side, and screw into the plastic back of the seat. A mystery solved.

When the screws are removed, the two halves come apart. (Leave the edging on the back piece or it'll be a nightmare putting it back on again.) The arms are easy to detach; each is held on by two screws.

Approximately 378,920 staples secured the fabric around the edges of the seat. We removed those.

Mystery number two: there was a seam across the fabric where the vertical backrest met the horizontal seat. And somehow that seam was anchored to the chair.

Turns out two pieces of fabric were stitched together, leaving a 3-inch seam allowance. This extra flap was tucked down into the crack between the foam pieces and stapled to the bottom of the chair.

We removed it and pinned the fabric onto the new woodgrain material. (Monalis from IKEA.) Using the old fabric as a pattern, I cut out new pieces and Mum sewed them together, mimicking the seams and the topstitching from the original fabric.

Pa stapled the new fabric down into the crack while I squished the foam down. (Yeah, I call him Pa. It's the most suitable name for dads on farms.)

Then we stretched the fabric around the edges of the chair, stapling it in place. The old foam and batting were in fine shape, so we reused them. Then the arms and front and back pieces of the chair were screwed back together again.

Because these chairs will be used on our hardwood floors, we put felt discs under the feet so they'll slide without scratching the floor. I'm opposed to wheels and floor mats because they're ugly.

Here they are in all their glory!

Senin, 19 September 2011

Make simple tote bags with The Purl Bee

Outside Oslo, the fabric line I designed for The Needle Shop, is now stocked at Purl Soho. A beautiful store in New York City, Purl Soho has an equally lovely blog that showcases projects made from the goodies they sell. Check out these Oslo tote bags that take just twenty minutes to whip up. Find a link to the instructions in The Purl Bee post right here.

Kamis, 15 September 2011

My new favorite magazine

Can the Danish magazine BoligLiv be my new favorite magazine, even though I can't read a word of it? Awhile back they contacted me for permission to use a small photo of my DIY bunting birthday card, offering to send over a magazine when the September issue was printed.

Guys, it's so lovely and full of products I'm coveting. Sofas! Bookshelves! Pillows! I want to make all the recipes and live in all the beautifully photographed homes. Apparently in Denmark, everything is spare and modern with a dose of quirkiness to keep it fun.

Google suggests that BoligLiv means "housing life." If that's a weird translation, maybe a Danish reader can help me out. Visit BoligLiv's site right here, translated into English. Be sure to check out the Creative Ideas section. Some project highlights:

A customized roller shade with instructions right here. (Or rather, "A drop down with a personal aside," as Google helpfully informs us.)

A mismatched mosaic tile backsplash, right here. Enjoy browsing!

Rabu, 14 September 2011

How to make wall art from wood scraps

Janine at Salvage Love has posted a tutorial for the DIY wall art she made for her living room. She snatched up a pile of leftover wood scraps from her dad and transformed them into this! Learn how right here. You don't have to paint yours orange, but I highly recommend it.

(Photos by Claire Ferrante)

Rabu, 07 September 2011

How to "wallpaper" using fabric

I couldn't stand our boring white door anymore. Something had to be done. So over the weekend, we wallpapered it with a big, fun piece of fabric. I love it. And it's useful, too. There are four white doors in this corner of the apartment—bedroom, bathroom, coat closet, and outer door—and sometimes departing guests get confused about which one they came through. Now we'll just tell them to exit through the village.

This fabric is fairly thin cotton from IKEA. It's called Britten Hus and designed by someone named Emma Jones. No relation that I know of, but clearly someone I would like. She's also got this handwriting print which I adore. Someone should use it! Bed sheets would work really well, too.

For this DIY fabric wallpaper project, you'll need water, cornstarch, a big brush (or a paint roller if you want to do a larger wall), scissors, and a craft knife if you have obstacles like we did.

First mix up your paste, since it will need time to cool. I made way too much, but better safe than sorry. I don't think I even used half of it, so you might want to cut this recipe down. I adjusted a bit to get a nice consistency that's thickened, but pourable. Like really thick gravy.

Boil 4 cups of water in a pot. Mix about 3/8 cup cornstarch with a little water in a small bowl until the powder is dissolved. Add the cornstarch mixture to the water slowly while stirring. Boil until thickened and then let it cool.

In the meantime, measure the area you want to wallpaper and cut your fabric to size. I just made small cuts in the edge of my fabric and tore each side, since I knew it would make a straighter line than I could cut. I trusted that the design was printed to be aligned with the grain.

Brush the entire door with paste, then begin applying fabric from the top down, adjusting and smoothing as you go. The paste is very forgiving and will allow you to smooth out wrinkles or peel a section back off and reposition it. If you need more paste in dry spots, just brush more on. It doesn't change the color of the fabric when it's dry.


Use a scissors or Xacto knife to cut around any obstacles. We made a few quick slits where the lock and doorknob were, just to get the fabric fitted over them so we could continue smoothing out the rest of the door. Then we went back and trimmed carefully around the hardware with a knife. Apply more paste to stick down the raw edges.

Finally, we back went around the sides of the door and applied a little extra paste to smooth down any loose edges. The paste will keep the raw ends from fraying. If you like, you can brush another coat of paste over the entire door, decoupage style. Our fabric was stuck down well enough and I liked the soft fabric texture, so I opted not to. If you use thicker fabric, it might be a good idea to glue it down a little better with a top coat, though.

When you're tired of the fabric, just pull it off and your paint job is unharmed. You may need to use a damp sponge to wipe off any clear paste residue or thread stragglers. I'd also suggest machine washing brightly colored fabric first to make sure the dyes don't bleed when the fabric is moistened with paste—do a small test first.

Update: To show how the fabric peels off, I pasted another chunk onto my hallway wall, then pulled it off.

The fabric peeled off easily. In this case, the edge of the glued area showed slightly. After taking this photo, I went over it with a damp sponge to see if I could erase it, but that just made the faintly darker area larger. The slight discoloration is the result of getting the wall damp. The walls in my hallway have flat paint, which doesn't like wetness—it always shows every water drip and isn't very wipeable. I don't mind, since this part of the hallway is dim and it doesn't show. Or I can always wipe the whole wall with a moist sponge and it will all match!

If your wall or door has flat paint, you might want to cover the whole area with fabric so you don't see any discolored edges where the fabric starts and stops. If your paint is satin or semi-gloss, which withstands moisture much better, I don't think you'll see any lines at all. You can always test a small area first.

Jumat, 02 September 2011

DIY chair makeover tutorials

With a long weekend ahead of us, my thoughts turn to home projects. A conversation about seating last night has prompted this post: a smattering of ideas for transforming chairs. My favorite? The DIY herringbone tutorial from Martha Stewart, above.


For more inspiration, also check out:

Maya Made's freezer paper stenciled chair

Love.Life.Larson's simple striped chair

Ana White's pleated slipcover

How Joyful's office chair reupholstery project


Have a great holiday weekend, everyone!

Rabu, 31 Agustus 2011

Sewing with Oilcloth book and free patterns

I'm always attracted to the oilcloth section in fabric stores. So shiny and retro and wash-offable. But I always stop short of buying any since I don't know what to do with it. I just received a review copy of Sewing with Oilcloth by Kelly McCants, and it's got 20 DIY sewing projects for oilcloth and laminated cotton. Download a couple sample project tutorials at the end of this post!


The book offers lots of tips and tricks for working with oilcloth. Should you pin it? Iron it? Wash it? How do you finish bias trim? Will your sweaty legs stick to an oilcloth cushion on a hot summer day? Wonder no more. (Well actually, that last question is not addressed in the book, but the rest are.)


I haven't tested any of the directions yet, but everything is super cute. You could sew a makeup bag.


Or a box cushion.


Or an apron, wallet, storage bin, baby bib, messenger bag, or the farmer's market tote above. In fact, you can download a printable PDF (5 MB) with instructions for that tote here. Or get PDF instructions (27 MB) for the book's chalk cloth table runner project here.